Friendship bracelets have been popular for generations, and it’s not hard to see why. These colorful, handmade bracelets are a fun and meaningful way to show appreciation for your friends and loved ones. Whether you’re making them as a gift or just for fun, creating your own friendship bracelets is a great way to express your creativity and spend time with loved ones.
Knotted Friendship Bracelet Instructions
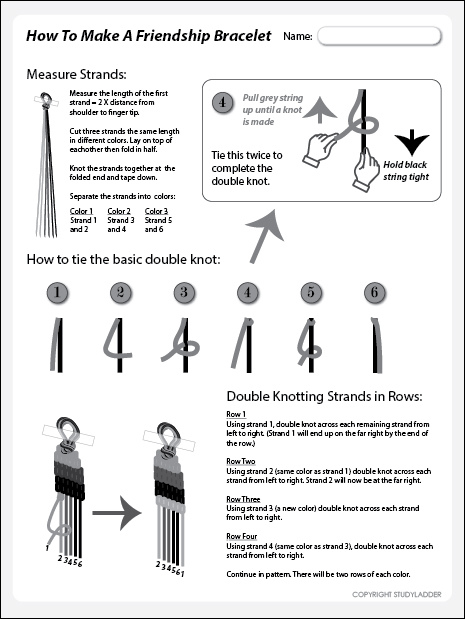
 One of the most classic friendship bracelet patterns is the knotted bracelet. These bracelets are easy to make and can be customized with any color combination you like. Here are step-by-step instructions for making a knotted friendship bracelet:
- Cut six strands of embroidery floss in the colors of your choice. Each strand should be about 12 inches long.
- Tie a knot in the center of the strands, leaving a few inches of loose thread on either end.
- Arrange the strands so that they’re in the order you want them to appear in the finished bracelet.
- Hold the leftmost strand and tie a knot around the next strand to the right. Repeat with the remaining strands until you’ve tied a knot around each one.
- Repeat step 4 until the bracelet is the desired length.
- Tie a knot at the end of the bracelet, leaving a few inches of loose thread.
- Cut off the excess thread and tie the loose ends together. Your bracelet is now complete!
Different Patterns for Friendship Bracelets
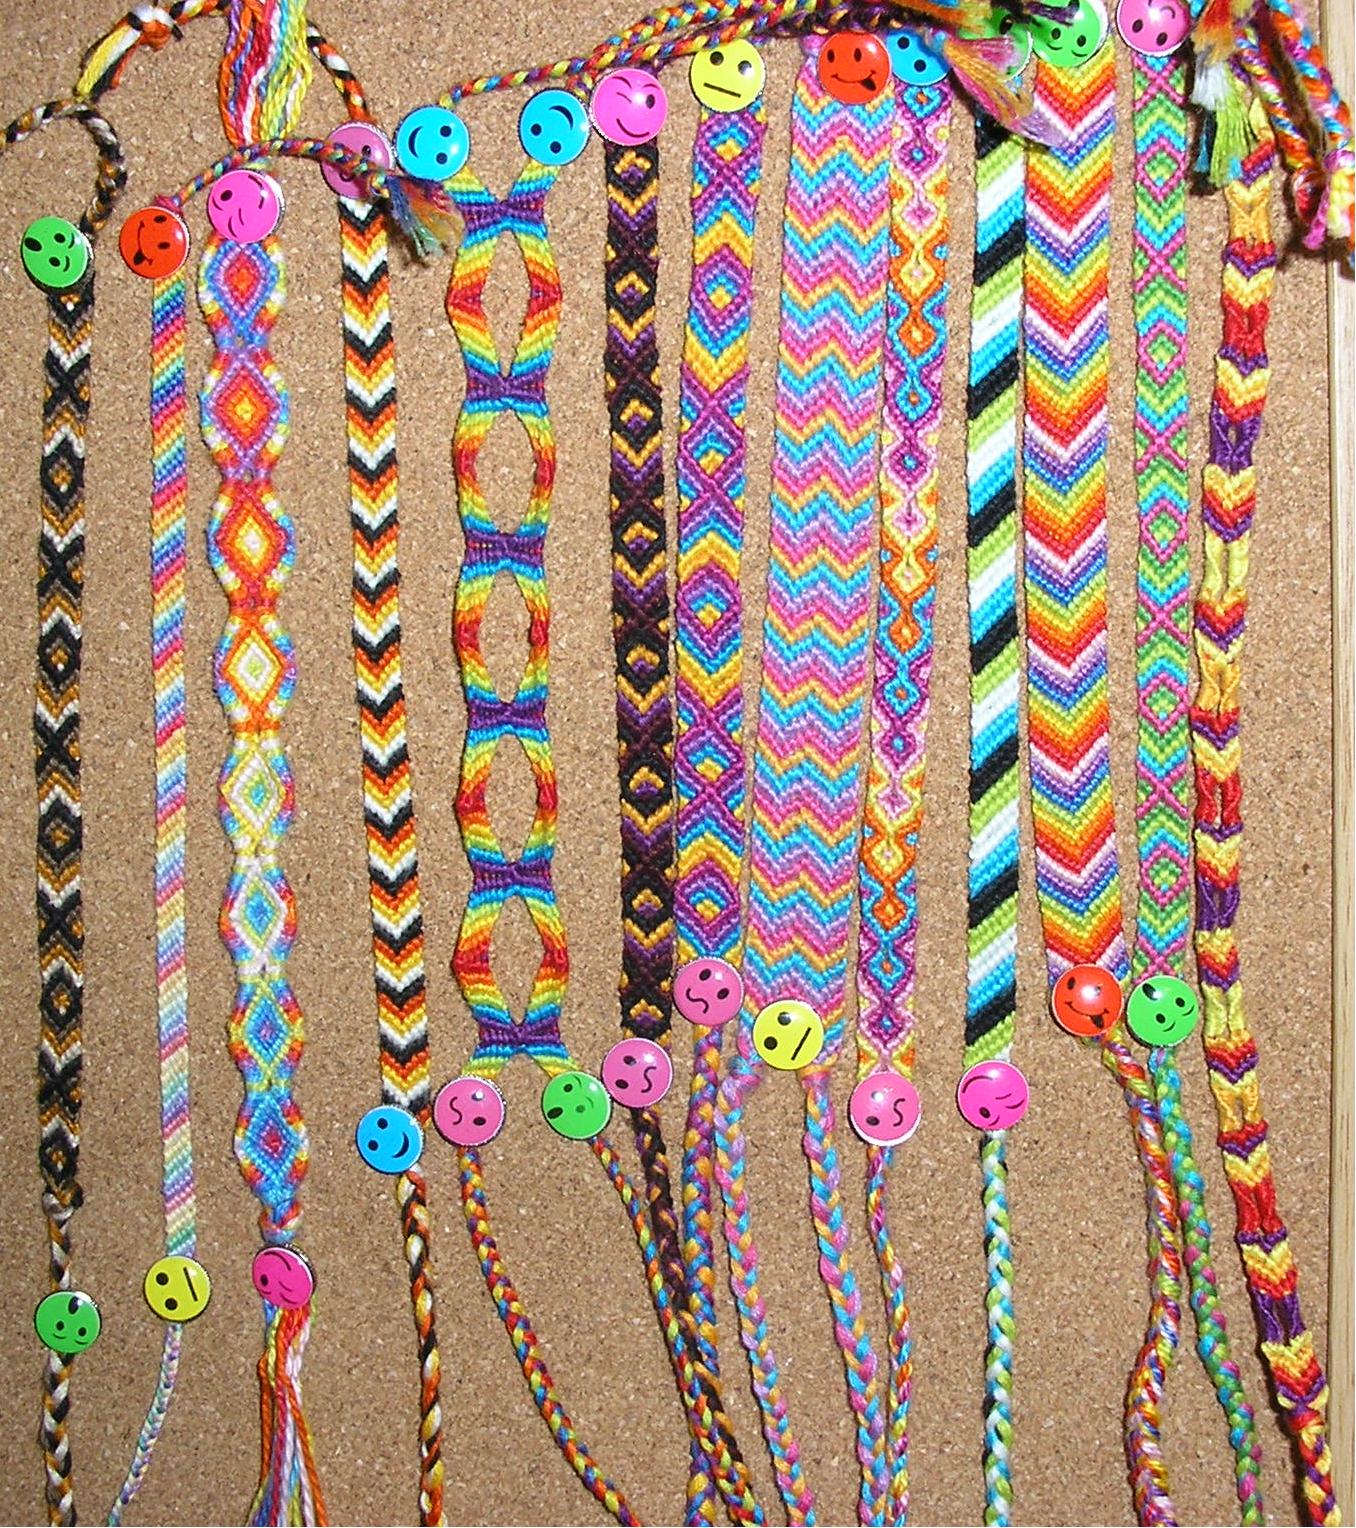 If you’re looking for more variety in your friendship bracelet designs, there are countless options to choose from. Here are just a few ideas:
- Chevron bracelet: This pattern features a zigzag design and is a bit more advanced than the simple knotted bracelet. You’ll need two colors of embroidery floss to create this bracelet.
- Alpha pattern bracelet: This pattern uses letters and symbols to create a message in your bracelet. Choose a word or phrase that’s meaningful to you and your friend.
- Beaded bracelet: Add a pop of color to your friendship bracelet with some beads. You can add beads to any bracelet pattern to personalize it.
- Heart pattern bracelet: This bracelet features a simple heart design and is perfect for Valentine’s Day or just to show your love for a friend.
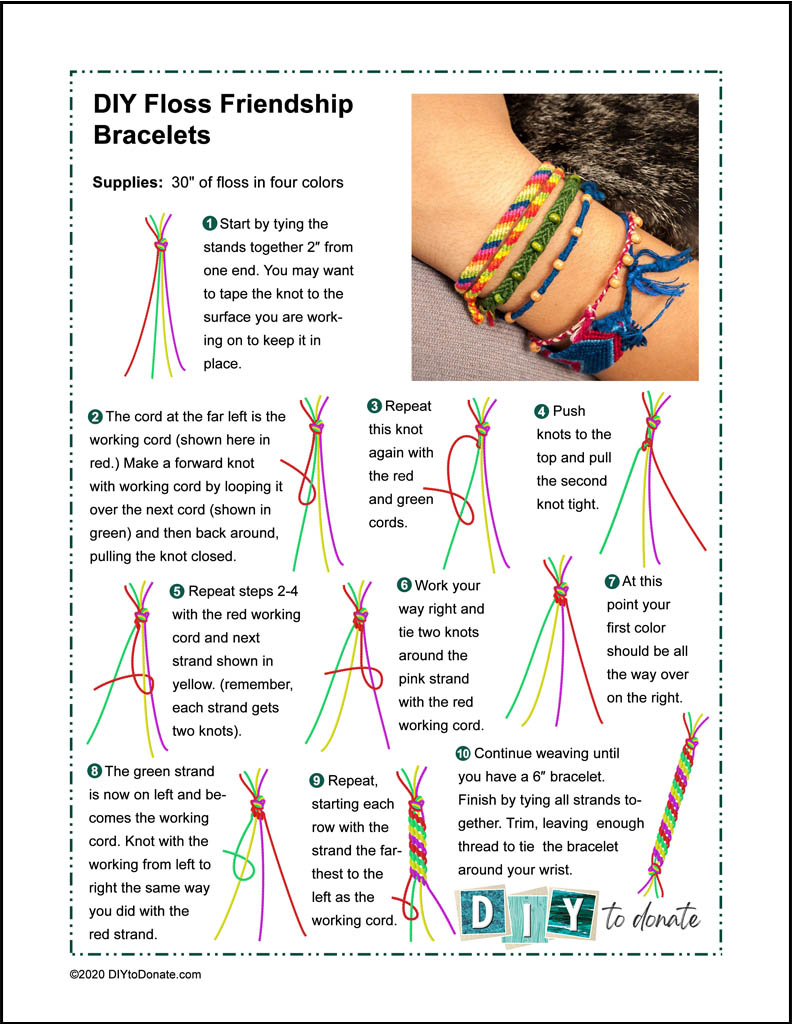
Making Friendship Bracelets Instructions
 If you’re looking for a more visual guide to making friendship bracelets, check out this step-by-step tutorial:
- Cut four strands of embroidery floss in two different colors. Each strand should be about 18 inches long.
- Arrange the strands so that they’re in the order you want them to appear in the finished bracelet.
- Tie a knot in the center of the strands, leaving a few inches of loose thread on either end.
- Hold the leftmost strand and tie a knot over the next two strands to the right. Repeat with the rightmost strand, tying knots over the next two strands to the left. You should now have a “V” shape in the center of your bracelet.
- Repeat step 4 until the bracelet is the desired length.
- Tie a knot at the end of the bracelet, leaving a few inches of loose thread.
- Cut off the excess thread and tie the loose ends together. Your bracelet is now complete!
Easy Friendship Bracelets to Donate
 Friendship bracelets don’t just make great gifts - they can also be used for a good cause. Many organizations, including hospitals and nonprofits, accept handmade friendship bracelets as donations for patients and those in need. Here’s how to make a simple friendship bracelet to donate:
- Cut four strands of embroidery floss in the colors of your choice. Each strand should be about 12 inches long.
- Arrange the strands so that they’re in the order you want them to appear in the finished bracelet.
- Tie a knot in the center of the strands, leaving a few inches of loose thread on either end.
- Hold the leftmost strand and tie a knot around the next strand to the right. Repeat with the remaining strands until you’ve tied a knot around each one.
- Repeat step 4 until the bracelet is the desired length.
- Tie a knot at the end of the bracelet, leaving a few inches of loose thread.
- Cut off the excess thread and tie the loose ends together. Your bracelet is now ready to donate!
DIY Friendship Bracelets
 Making friendship bracelets is a great DIY project that can be done alone or with friends. Here are some tips for making your own friendship bracelets:
- Experiment with different color combinations and patterns to create a unique bracelet.
- Use a clipboard or binder clip to keep your bracelet in place while you’re working on it.
- If you’re having trouble keeping your knots tight, try using a needle or toothpick to push them into place.
- Don’t be afraid to try more advanced patterns as you get more comfortable with making friendship bracelets. There are endless possibilities!
Friendship Bracelet Instructions
 If you’re just starting out with making friendship bracelets, it can be helpful to have some basic instructions to get you started. Here’s a simple pattern to try:
- Cut four strands of embroidery floss in the colors of your choice. Each strand should be about 12 inches long.
- Arrange the strands so that they’re in the order you want them to appear in the finished bracelet.
- Tie a knot in the center of the strands, leaving a few inches of loose thread on either end.
- Hold the leftmost strand and tie a knot over the next strand to the right. Repeat with the remaining strands until you’ve tied a knot around each one.
- Repeat step 4 until the bracelet is the desired length.
- Tie a knot at the end of the bracelet, leaving a few inches of loose thread.
- Cut off the excess thread and tie the loose ends together. Your bracelet is now complete!
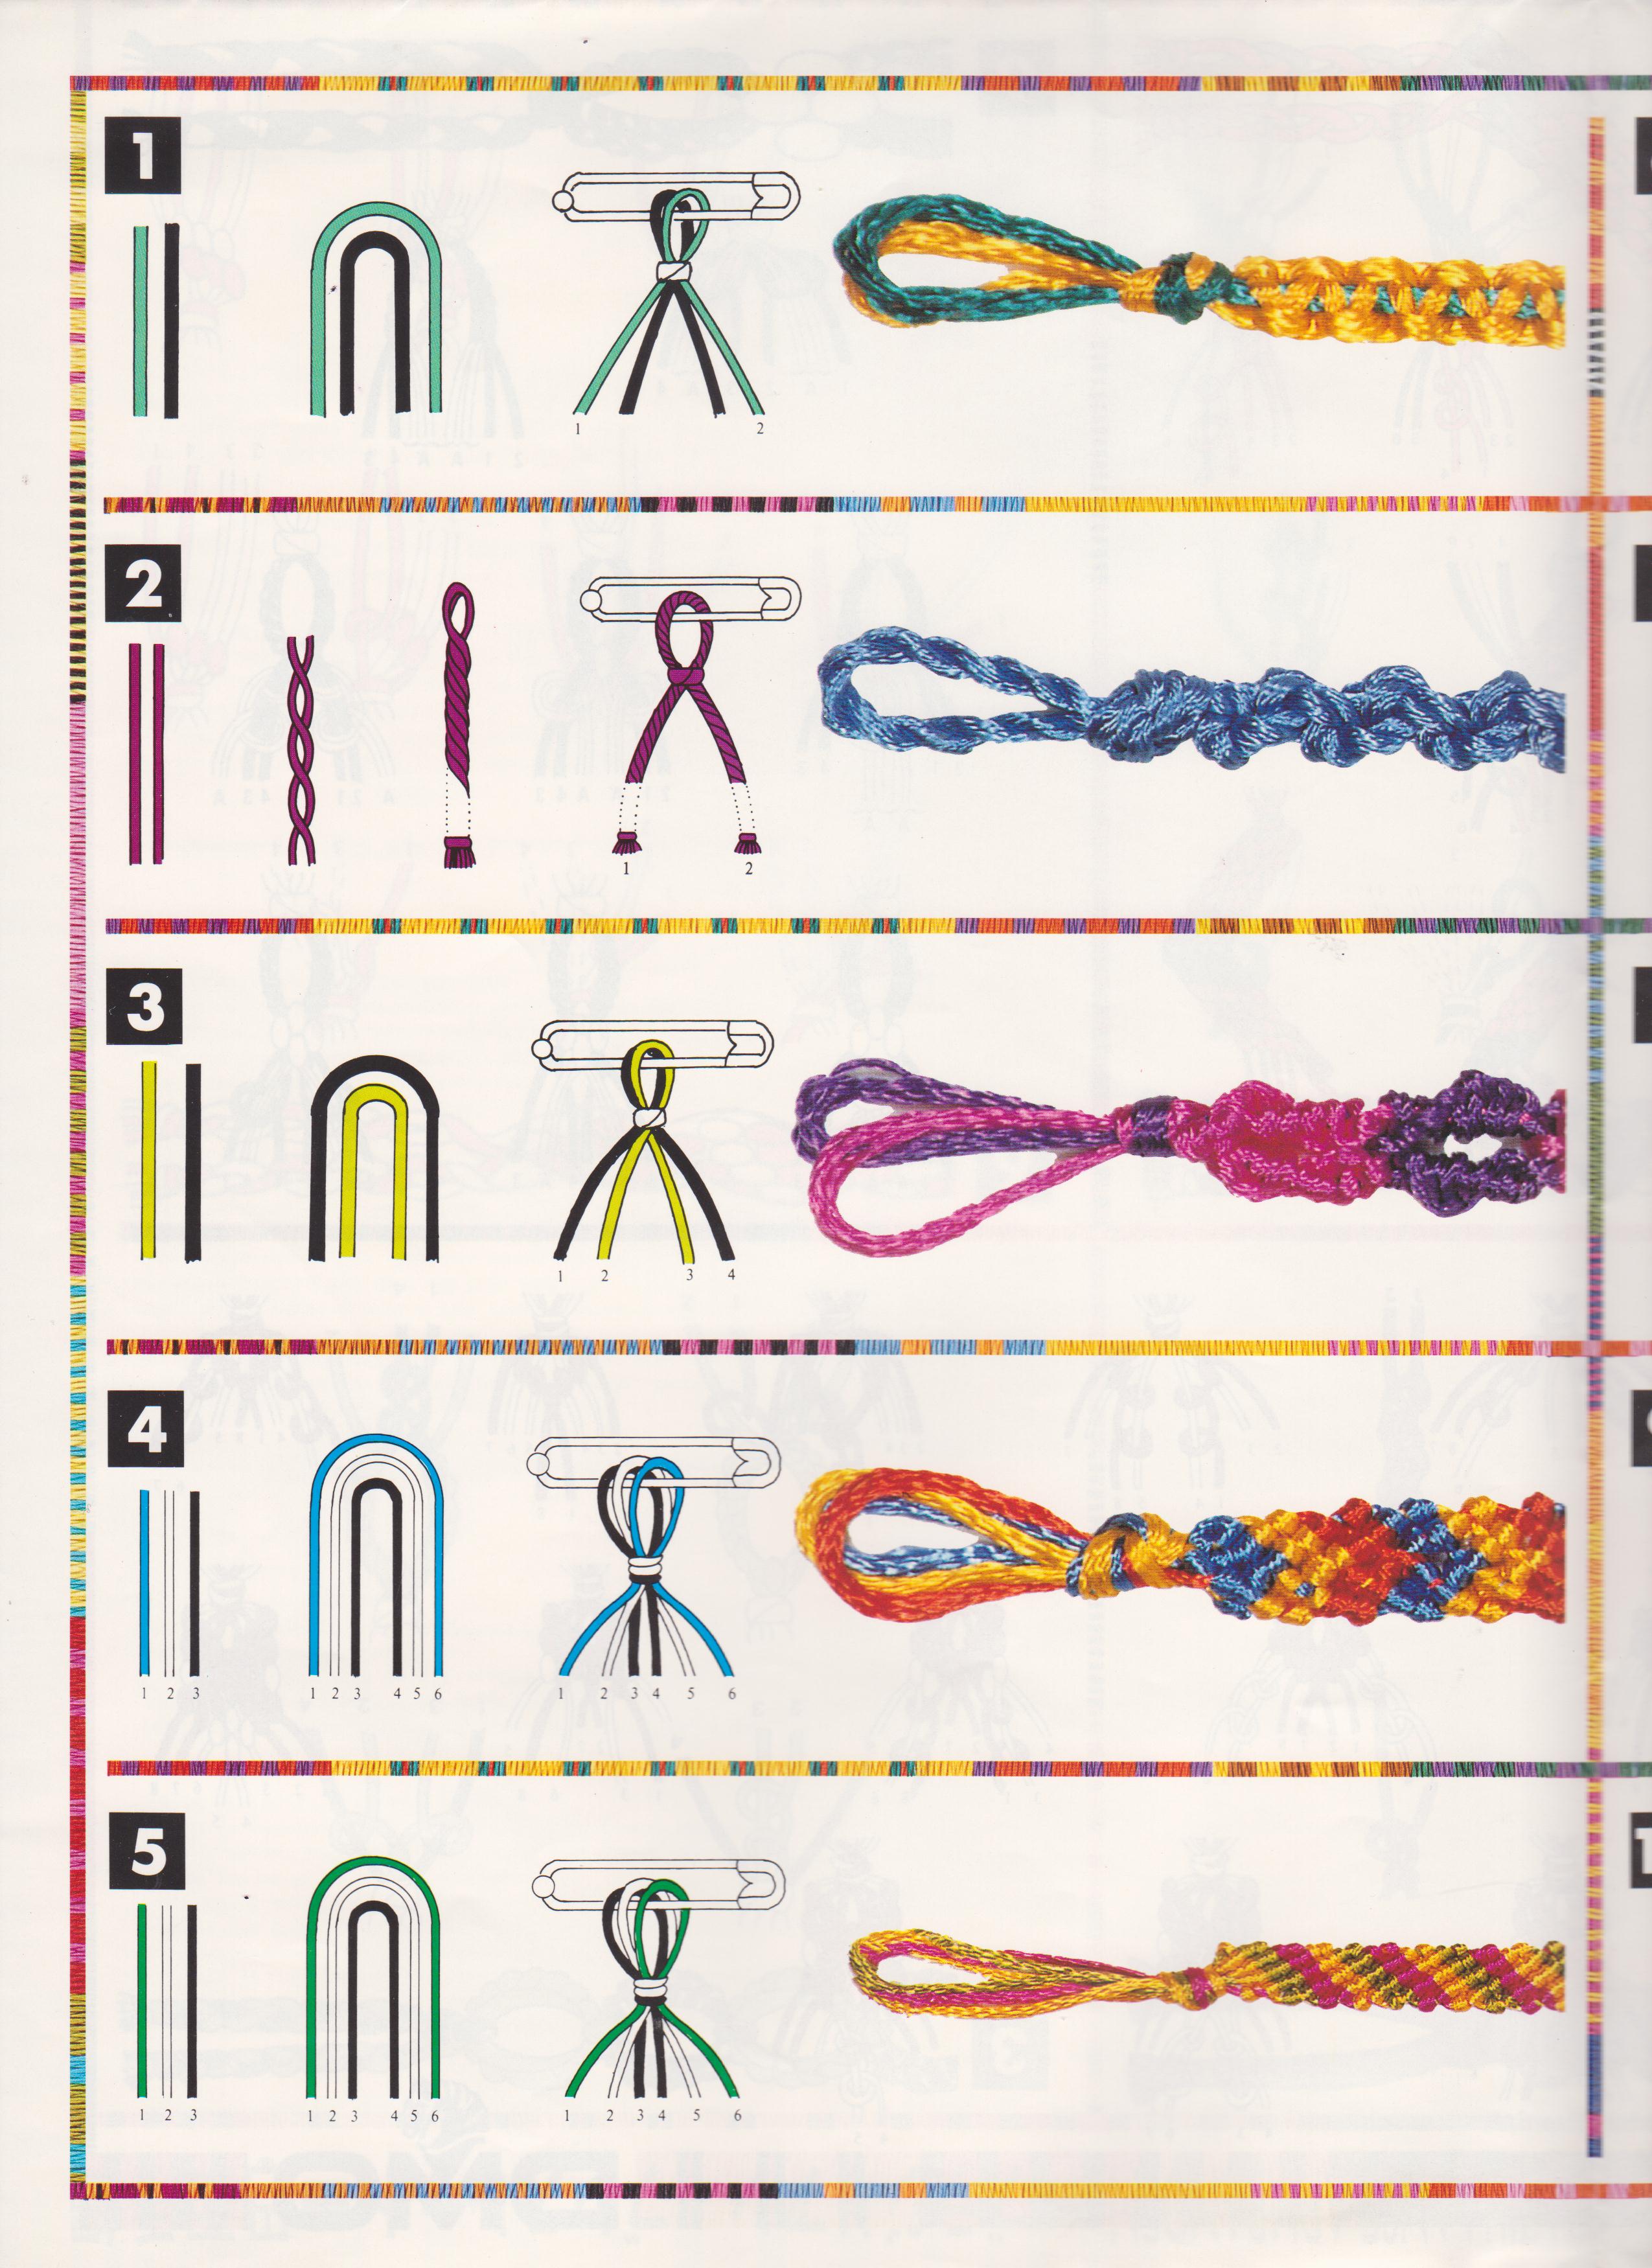
Chevron Friendship Bracelet
 The chevron friendship bracelet is a classic pattern that features a zigzag design. Here’s how to make your own chevron friendship bracelet:
- Cut four strands of embroidery floss in two different colors. Each strand should be about 18 inches long.
- Arrange the strands so that they’re in the order you want them to appear in the finished bracelet.
- Tie a knot in the center of the strands, leaving a few inches of loose thread on either end.
- Hold the leftmost strand and tie a knot over the next two strands to the right, creating a diagonal line. Repeat with the rightmost strand, tying knots over the next two strands to the left to create the opposite diagonal line. You should now have a “V” shape in the center of your bracelet.
- Repeat step 4 until the bracelet is the desired length.
- Tie a knot at the end of the bracelet, leaving a few inches of loose thread.
- Cut off the excess thread and tie the loose ends together. Your bracelet is now complete!
Beginner Friendship Bracelet Wheel Patterns
 If you’re looking for some inspiration for your next friendship bracelet project, here are 10 beginner patterns to try:
- Striped spiral bracelet: This bracelet features a spiral design with alternating colors.
- Zigzag bracelet: This pattern is similar to the chevron pattern, but with shorter diagonal lines.
- Candy stripe bracelet: This bracelet features two or more colors in alternating stripes.
- Wavy bracelet: This bracelet features a wavy design with alternating colors.
- Double chain bracelet: This pattern features two parallel chains of knots, each with a different color of floss.
- X pattern bracelet: This pattern features a simple X design and is great for beginners.
- Arrowhead bracelet: This pattern features an arrowhead design and can be customized with any color combination.
- Spiral bracelet: This bracelet features a spiral design with a single color of floss.
- Heart bracelet: This bracelet features a heart design and can be customized with any color combination.
- Square knot bracelet: This pattern features a square knot design and is great for beginners.
Easy Friendship Bracelet Patterns Printable
 If you’re looking for even more friendship bracelet patterns, check out these printable designs:
- Polka dot bracelet: This bracelet features a polka dot design and can be customized with any color combination.
- Flower bracelet: This bracelet features a flower design and can be customized with any color combination.
- Butterfly bracelet: This bracelet features a butterfly design and can be customized with any color combination.
- Star bracelet: This bracelet features a star design and can be customized with any color combination.
How to Make a Friendship Bracelet
 Now that you know all the basics of making friendship bracelets, it’s time to get started on your own project. Whether you’re making one for yourself or as a gift for a friend, these bracelets are a fun and meaningful way to express your creativity and show your appreciation for the people in your life.
So gather your supplies, find a pattern that speaks to you, and get crafting! With a little practice, you’ll be a friendship bracelet pro in no time.